Brother Xr6060 Sewing Machine Feeding Backwards
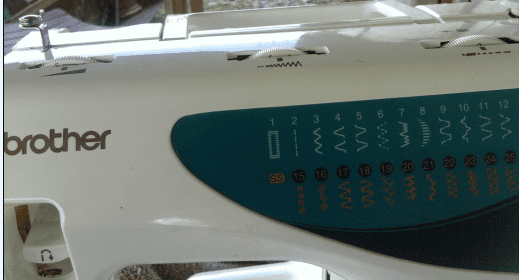
photo #1
All photos courtesy of Charlu
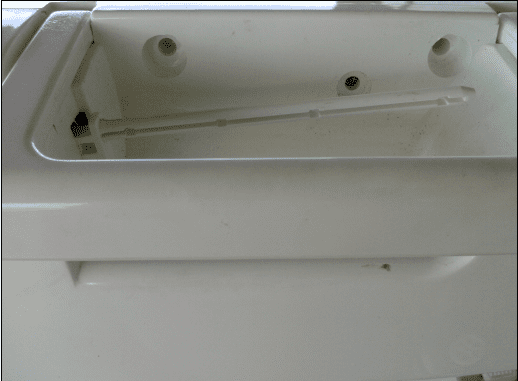
photo #2
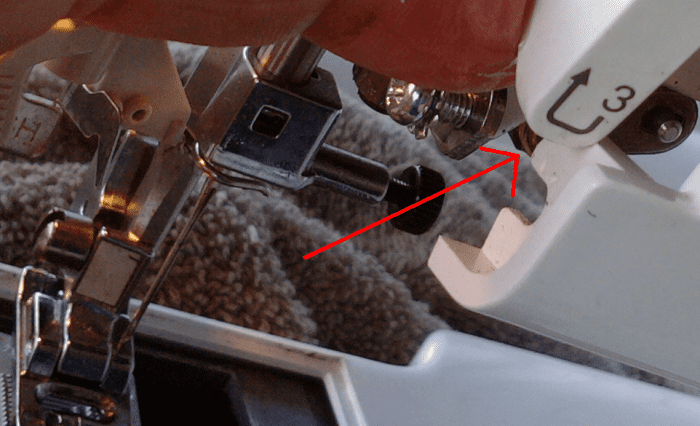
photo #3
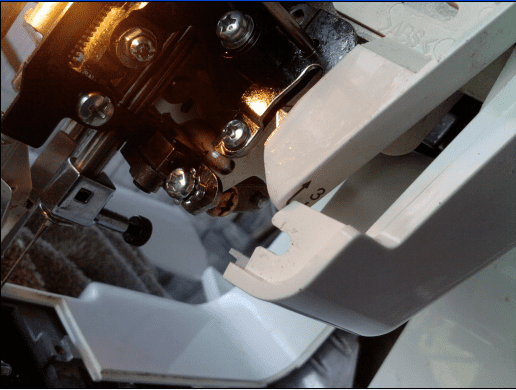
photo #4
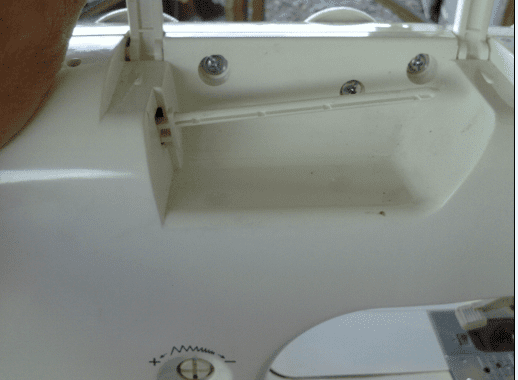
photo #5
The Beginning and Quick Ending of a Project
Being in the middle of a project and having to stop to take a sewing machine to the repair shop because it's stuck in reverse is a pain, especially if you have a deadline. Wouldn't it be nice and a whole lot easier if you could just DIY, fix it in no time having pictures to help along the way and get back to your sewing? That's what I thought anyway.
I was working on a recycling jeans project the other day and broke out my sewing machine which hasn't been used in a long time, and probably why it still looks like new. Then when I went to use it and it would only sew in reverse I got a little aggravated. Now I have to stop what I am doing, find a repair shop that services Brother sewing machines, take it there and you know you almost always have to leave it. Then when you go to pick it up days later the worst part is paying the bill when you get there and putting everything your doing on hold until it is fixed, .
Being that I was really motivated to get these projects done and honestly having fun while I was doing it, I figured how hard can it be. So the Google search began. Then I was really shocked at how many people were having the same problem. I started to get even more aggravated when I saw a response to a very polite request from a woman that went like this, "For all you people that have the same problem just take the cover off and oil the mechanism. Make sure you move it back and forth while you oil it." OK I'm no sewing machine tech, shoot I hardly ever even sew, making me wonder how I am supposed to know where this mechanism is, what it looks like, and how will I know when it's fixed. Now determined to find out, take pictures, and hopefully make it easy for everyone else by posting this hub, I began my mission and here's how I did it.
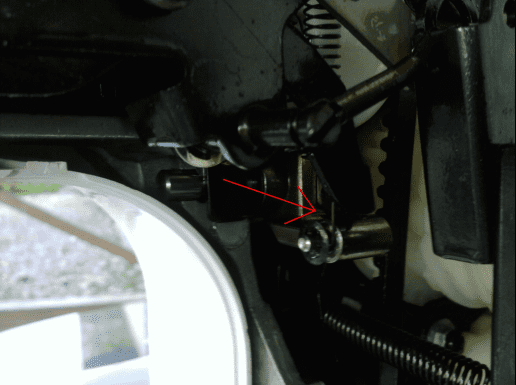
photo #6
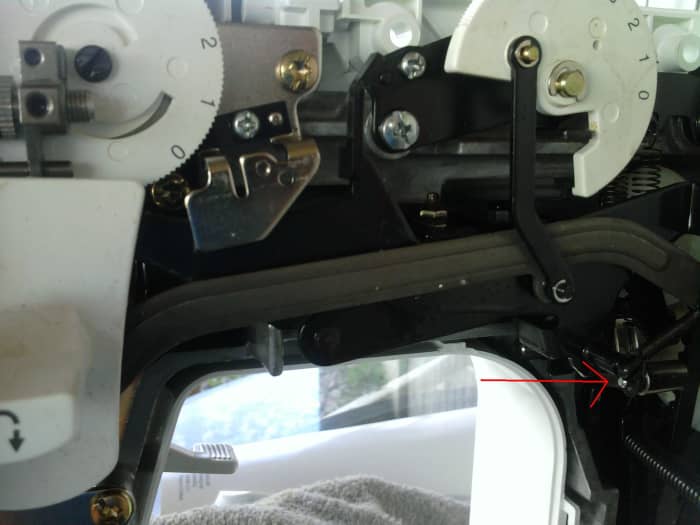
photo # 7

photo #8
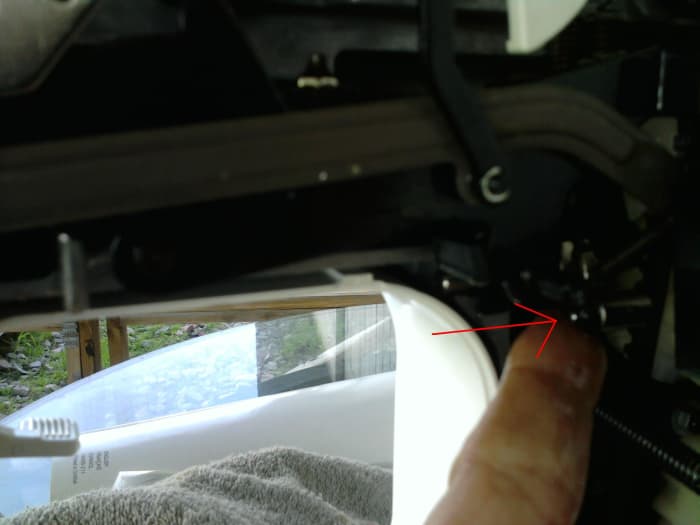
photo #9
It's Time to Get Started
You will need sewing machine oil (I used WD40 I don't know what the difference is but it worked) and a screwdriver (I used the one that came with the machine)
Remember I am NOT a sewing machine tech so take into consideration this is what worked for me, and I thought it was pretty simple once I found the mechanism and saw how it worked.
1) The first thing you need to do is remove all the screws which hold the cover on. I took off the screws on the top, bottom, and sides near the handle and spool holder (pics 1,2,5 and some on bottom). If you start to lift off the cover and it seems difficult make sure to check for more screws and also the plastic piece as shown in pic #3. Just push the piece out so that it looks like pic #4 so that it doesn't catch. The top of the machine where the adjustment wheels are (pic#1) make it necessary to kind of pull out a little and then up.
2) Find the mechanism as shown by the red arrows in pics # 6 & 7. If you are still having trouble finding it just push down the reverse button and watch as the piece goes down to the right (pic #8). If you look at the end of that piece the mechanism is just below it.
3) Put some oil on the mechanism and push it up and down as in pic #9. I had to use what I thought was quite a bit. I also oiled all the other moving parts while I was in there. If your smart you'll consult your manual for this, but I was in a hurry as always. You'll notice the different pieces that move as you keep oiling and moving it up and down. It should also become easier as you do it. When you feel it's gotten easier push it in the up position and push down the reverse button making sure it goes down. When you release the reverse button it should pop back up on it's own. If it doesn't do some more oiling and pushing up and down then check it again. Once it is automatically going back into position Walla you're done.
4) Now you just put everything back together and get back to your project. Easy, wasn't it.
Once you've done this, you will have no problem oiling the machine on your own. I probably went a little overboard but I think of the moving parts like my arthritis and how I wish I could put some oil in there to help (just kidding I think)
Marge on June 17, 2020:
Help!! Just bought the brother xm2701 everything is working except the reverse lever will not go down when I press on it . It's like stuck!
Charlu (author) from Florida on October 18, 2018:
Hi Connie. I'm not sure why you're not seeing the pictures as I've accessed the article with two different phones and laptops and they show up. I suggest trying again and possibly contacting Hubpages
Scroll to Continue
Connie , on October 17, 2018:
Hows come I don't see any pics
Charlu (author) from Florida on April 10, 2015:
Hi Amaia You are so welcome and thank you for taking the time to let me know it helped. I am so glad it made your day because you just made mine Have a great weekend and happy sewing:)
Amaia - You Made My Day on April 08, 2015:
You just literally saved my life! I just fixed my sewing machine that stopped functioning correctly without reason! Thanks a lot!
Charlu (author) from Florida on October 20, 2014:
Hi Trasi
That is so awesome and I hope you got a great deal. Have an incredible day and thanks for taking the time to let me know about a new way I could save some money :)
Trasi on October 17, 2014:
Thank you so much for this info. I just fixed a machine I got at goodwill with this info!
Charlu (author) from Florida on July 17, 2014:
Hi Phillippa I'm so glad it helped and thank you for letting me know, as I was surprised at the responses and number of people who have had the same problem. Have an incredible day and happy sewing!
phillippa on July 17, 2014:
Another thank you to add to the list. Such a helpful thing especially with the pictures. Saved me a pricey visit to the repairers and helped me get to know my machine better. Thank you so much
Charlu (author) from Florida on April 20, 2014:
Hi Lisa
Ditto on the sewing in reverse :) and thanks for letting me know it helped. Have an incredible day.
Lisa on April 19, 2014:
Thank you so much for this tutorial!! I was sewing away on a project for someone and the machine just starting going in reverse. I admit I am good at what I do but.....I am not sewing everything in reverse!! LOL
Charlu (author) from Florida on April 10, 2014:
Jemma Thank you for your post and Renita for her comment on the clips. I have now had to do this a few times because I don't use my machine that much. Happy sewing and have an incredible day.
Jemma on April 08, 2014:
Thanks so much for posting this tutorial, I thought I was going to have to take my machine into the shop (major hassle!) but you saved me the trip. Thanks also to Rentia because I just COULD NOT get the case open until I read her comment and realised I must have the hidden clips. :)
Charlu (author) from Florida on March 27, 2013:
Thank you Judith for taking the time to let me know it worked and I am so glad it helped. Have an incredible day and a wonderful time sewing :))
Judith on March 26, 2013:
I am so thankful for this site. I was sewing last night and then my sewing machine decided to go in reverse. I thought that was it, I would have to take it to someone to get fixed! But I looked online and fixed it myself just by following your instructions. Thanks so much!!
Charlu (author) from Florida on September 14, 2012:
Hi Brenda
I'm glad you found this hub helpful and thank you for taking the time to leave your wonderful comments. Have an incredible day.
brenda on September 12, 2012:
I found the info on this site extremely helpful. My sewing machine is purring like a kitten! Thank you so much,Add Your Comment...
Charlu (author) from Florida on July 21, 2012:
Hi Rentia
I am so glad this hub helped and am very thankful that you posted the details of how you got your machine to work. Maybe it will help someone else who is having the same problem. I know how it feels when that moment comes and Walla it's working again!!! Thanks again for taking the time to post how it worked for you with the extras steps you added for your machine. Have an incredible day and take care.
Rentia on July 21, 2012:
Thank you, thank you. I also had trouble getting the cover off, but there are two plastic tabs that need to be pried, one to the right of the foot almost half way to where the where the cover curves up, and another further along. In our case we discovered that the reverse tab, when released, would have no effect on the little spring that is supposed to put the machine back into normal stitching. So we sprayed the heck out of it, it got a little looser, but still not working, we had to manually push it back into position each time. With the machine apart, I put the foot plate back on and ran the machine with a piece of scrap fabric ( and no thread) back and forth, over and over, to get it working and to get the WD40 in everywhere. Then finally we decided to loosen the screw to the left of where the spring is attached and BINGO, it worked!!! SO happy. Would not have persevered if I had not seen your post. Many thanks
CRJen from San Ramón, Costa Rica on May 26, 2012:
Finally got it apart, oiled it...still sewing in reverse. My lever goes up and down just fine, wasn't ever stuck but the machine only goes in reverse. ??? Guess it's going to the shop. Thanks for the help.
Charlu (author) from Florida on May 24, 2012:
If all the screws are out take a look at photos 3 and 4 there is a piece there that has to be pulled out a little bit before it will come off. You should be able to tell if that's the only thing holding it down when you try to lift the cover off. If that's not it try and see what is holding it together and check again for screws.
Let me know and sorry to take so long to get back to you I've been working in the yard all day.
CRJen from San Ramón, Costa Rica on May 24, 2012:
Okay, got all the screws out but still can't get the #*@(!ing cover off!!! HELP!
Charlu (author) from Florida on May 23, 2012:
Hi Erin and thanks for your two cents, which will be worth a lot more to someone who is having the same problem.
I'm so glad you got it fixed!
Thanks for the help and I hope it will benefit others. Take care and have an incredible day.
Erin on May 23, 2012:
Just my two cents. I tried the wd40/oil trick with no success. i then tried loosening the gold screw below the reverse arm the held the reverse mechanism, and it sprung back up. seems it had froze after many months of no use. now it works like a charm.
Charlu (author) from Florida on April 21, 2012:
Hi Jilly Im so glad you were able to fix it. I was in the same situation and was so frustrated which is why I wrote this. Thank you for taking the time to comment and happy sewing. Take care
jilly on April 20, 2012:
thanks so much we have fixed my brother with your instructions no more stuck in reverse. you are so kind to help others out. thanks again.
Charlu (author) from Florida on November 14, 2011:
I'm glad to know it helped Cathie and thanks for taking the
time to let me know it worked Have an incredible day and I hope your curtains turn out fabulous
cathie on November 13, 2011:
thanks your advice - it was easy to understand and worked perfectly. I was able to fix the stuck reverse and carry on with my curtains. the day was NOT wasted and all that is thanks you to.
Charlu (author) from Florida on June 10, 2011:
That is so true about the no middle ground. I should do it more often but I just don't. I don't know about the excellent sewing but I do ok with what I've learned as long as there are no button holes:) I hope it works for her. Talk to you later
DREAM ON on June 10, 2011:
I told her about your hub and she was so excited you wrote about sewing.It seems either there are people who sew and know how or those who don't and they don't sew.There is no middle ground.Great hub and as far as I am concerned your sewer with a capital E for Excellent!!!Maybe tomorrow she will try again busy with work today.
Charlu (author) from Florida on June 09, 2011:
Hi Dream On I am a far cry from a seamstress but I've had that happen before. Make sure the machine is oiled well (see the instruction manual)or you can do like I do and if it moves it gets oiled :)When they sit for awhile they need to be oiled. Also one time I put the bobbin in the wrong and there was thread up in the feeder I couldn't see, or last but not least thread another bobbin because the other one may not be tight enough and be sure to hold the end piece (start piece) to where it won't stick out and get tangled. Once she gets it fixed she will use it a lot more When mine stuck in reverse it had been sitting for over a year. Thanks for your time and comments and let me know if it works. Talk to you soon
DREAM ON on June 09, 2011:
Good hub.I need sewing advice.My wife has a Kenmore sewing machine she is trying to learn to sew on.Her bobbin jams and then you have to take the bobbin out and start all over again.This happens when she sews for about 10 minutes almost all the time.She gets really mad.If the machine could fit out the window it would be sitting in our back yard right now.I tell her I'm a writer not a seamstress.The machine is brand new.She got it for Christmas a year ago.I thought it was a big christmas ornament because it stayed in the box for the first six months.Now it is out of the box and sits on a table for the past six months.I want to decorate it this year and call it a sewing tree. Have a good day.
Source: https://discover.hubpages.com/art/How-to-Fix-a-Brother-Sewing-Machine-Stuck-in-Reverse-With-Pictures
0 Response to "Brother Xr6060 Sewing Machine Feeding Backwards"
Postar um comentário